Writing a Library to Handle Delay Functions
This lesson is going to involve turning the function covered in lesson 2, into a library. This was one of the first libraries I ended up writing, and I have used it in almost every single sketch since. You will get alot of use out of this library if you do a lot of coding in the Arduino environment. As we did in the last lesson, we will write the example sketch alongside writing the library.
The 2nd half of this tutorial will focus on improving this library by adding the ability to do finite numbers of repeat events. We will use an OOP (Object Oriented) approach by creating a function we will call a delayEvent, which will perform delay events in response to control methods.
Finally we will package our library with a keywords.txt document, and move it into the Arduino libraries folder.
Starting Our Library
We will start this library just like the last one we made. Open a new Arduino IDE sketch and save it. I used the name autoDelay_example, however pick whatever name you wish for your new library. I am going to continue as if we have called it autoDelay, but if you have not just substitute the name you have used whenever this comes up in code.
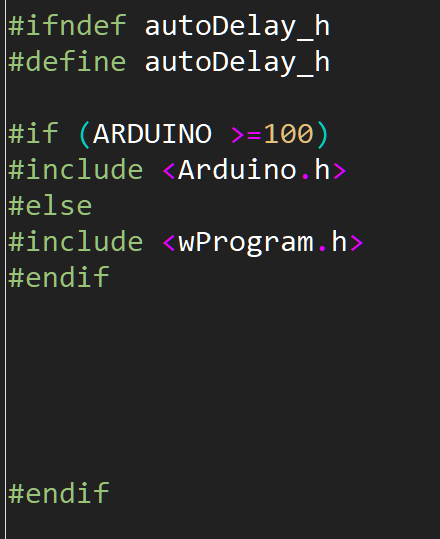
First we will fill in all the precompiler code required for the header file.
And we can add the #include for the header file to the .cpp file and our sketch page.

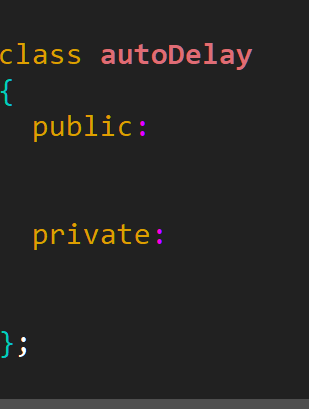
Next we will write our class name and class body in our header file.
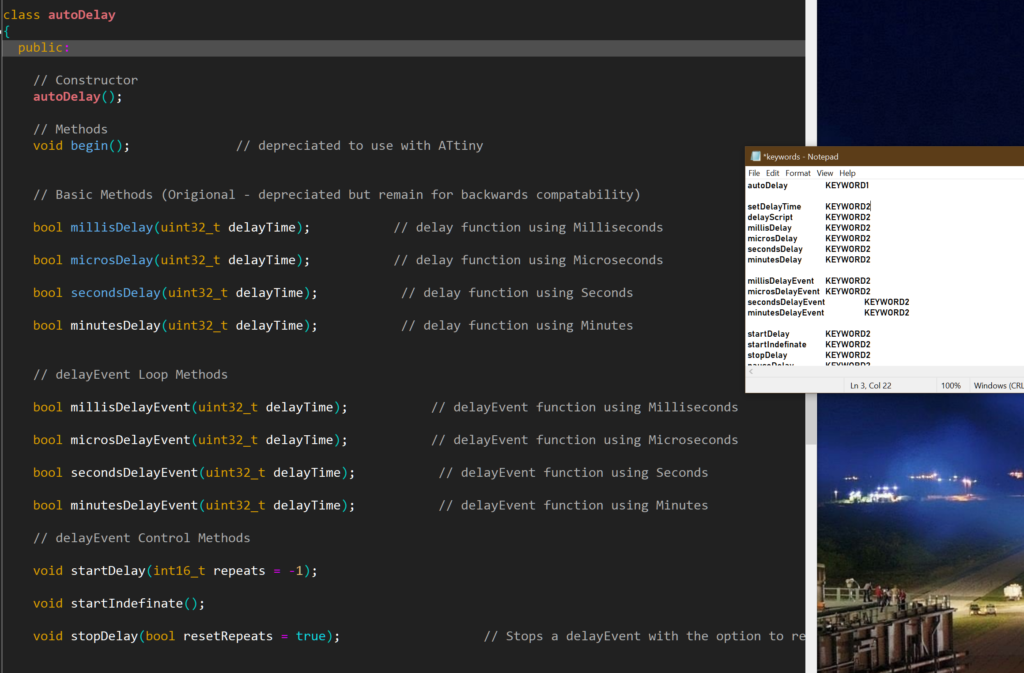
This time our constructor does not need any data to construct the object. The object we are constructing with this library will just be a software device, it does not interface with any external hardware device or any GPIO pin. Therefore, our constructor is much simpler.
In our header file, under public: in the class body, we write the prototype.
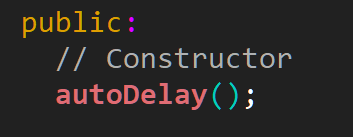
The constructor method is placed in the .cpp file, and this time we can leave the brackets empty as there is nothing required to set up an instance of autoDelay.

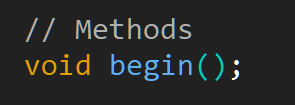
Our begin() function is just as sparse, as nothing is required during setup. We don’t even need to run this method during our setup() function, however we will include this function for good practice purposes. If we wanted to add in any serial debugging, we could add in a Serial.begin() into our begin method.
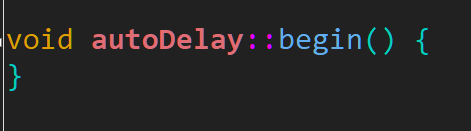
Remember for all the methods we write, we need both the prototype in the header file and the method in the .cpp file. From now on I will only focus on the method in the .cpp file.
Adding Functionality
So now lets look at the code snippet we ended up writing in lesson 2:

As an exercise, what information, or data/variables did we require to make this function work?
We have:
event_delayTime which would be the amount of time we wish to delay the event for in milliseconds. This will be an argument we can pass to our method as an argument every time it is called. This gives us scope to change the delay between events during runtime.
millis(); represents the current time value. This does not need to be a variable, but I prefer to write it into a variable in case we wish to debug, it may also save a few clock cycles between the first millis(); in our comparison statement, and the 2nd we use to save the time of the last event, so our timing will be more accurate.
lastEvent would be the millis(); value recorded the last time the event happened. This needs to be a global variable, as we need to retain it through multiple loops and use it for calculations. However there is no reason why anyone using this library will need to know this value, so we can make it a private variable.
So the only variable we need to add to our class body at this time is lastEvent, which for now I am going to call previousTime. (This is was arbitrary decision that I made as I was writing it because I feel it was clearer in context. What we call it does not matter as long as we can identify what the variable is.) We can enter this into our class body, under the private heading.

As our delay method is going to be hidden inside our library, we cannot just copy and paste the function we want affected by this delay method into the space we have commented ”//Put our delayed event here”
For this reason we will need to make our method return a flag, if the time has passed. This could be used in if statements in our main code to check if an event should be performed.
So this is what our method could look like. Remember to add the prototype to the header file, as well as this method to the .cpp file!
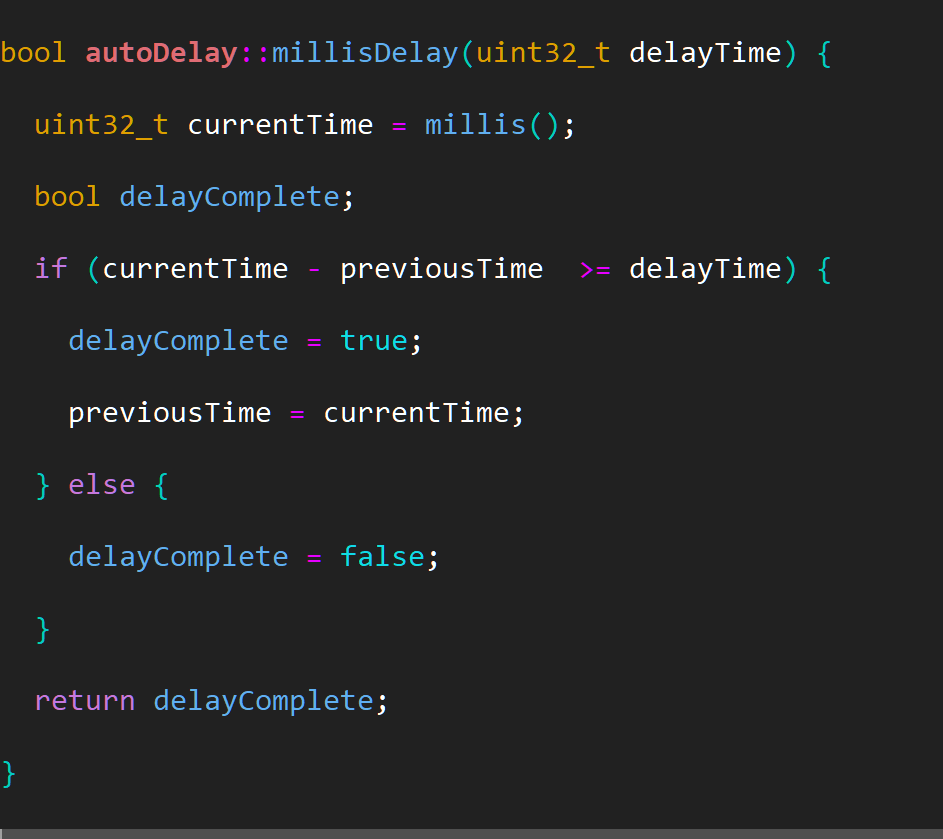
As before, we have used the className::method syntax. We have set delayTime as an argument, as this means we can pass different values to this script. In the prototype function in the header file, we could add a default value for the delayTime variable. 1000mS would be a good value to pick, so our delay script defaults to 1 second of delay if no other arguments are passed when the method is called.
We have made currentTime a local variable, and we have also introduced a bool delayComplete, which is returned from the function as true if the delayTime has been passed.
Starting the Example Sketch
We can now start working on our example sketch. Underneath our #include for the header file, we need to specify a constructor for the autoDelay object.

We don’t need to pass this any arguments, and we don’t need to include anything in the setup() function.
Above the loop(); function, I have added another precompiler command to make our program easily modifiable. The #define command replaces any text that matches DELAY_TIME, with the text 5000. We have used capitals for this to ensure that we don’t end up replacing text in an unintended place. This is a good way of adding in easily user modifiable constants without declaring them as a variable. I often used this method to define settings for a program that can have several different configurations.

Our main loop could now look something like this.
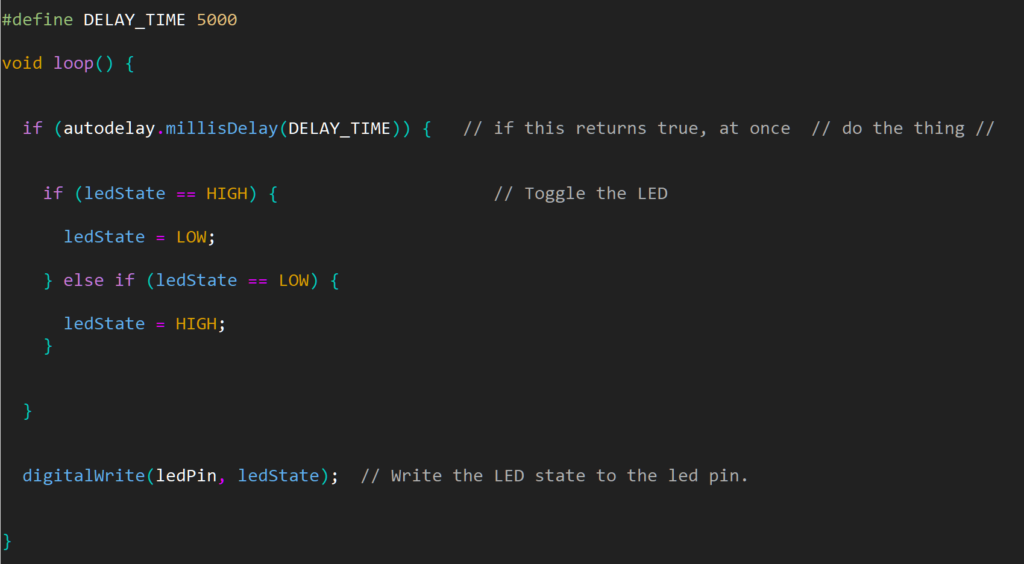
All the maths, variables and functions required to track the passage of time are hidden inside the autoDelay object.
Our method millisDelay(); is passed a delay value and when it returns true, our program will execute the code wrapped in the if statement.
Remember in the last lesson, we created two ledObjects and each one acted completely independently? We can do the same thing here. This example is a program similar to the police lights from lesson 6, however this one would flash a red and a blue LED at different speeds.
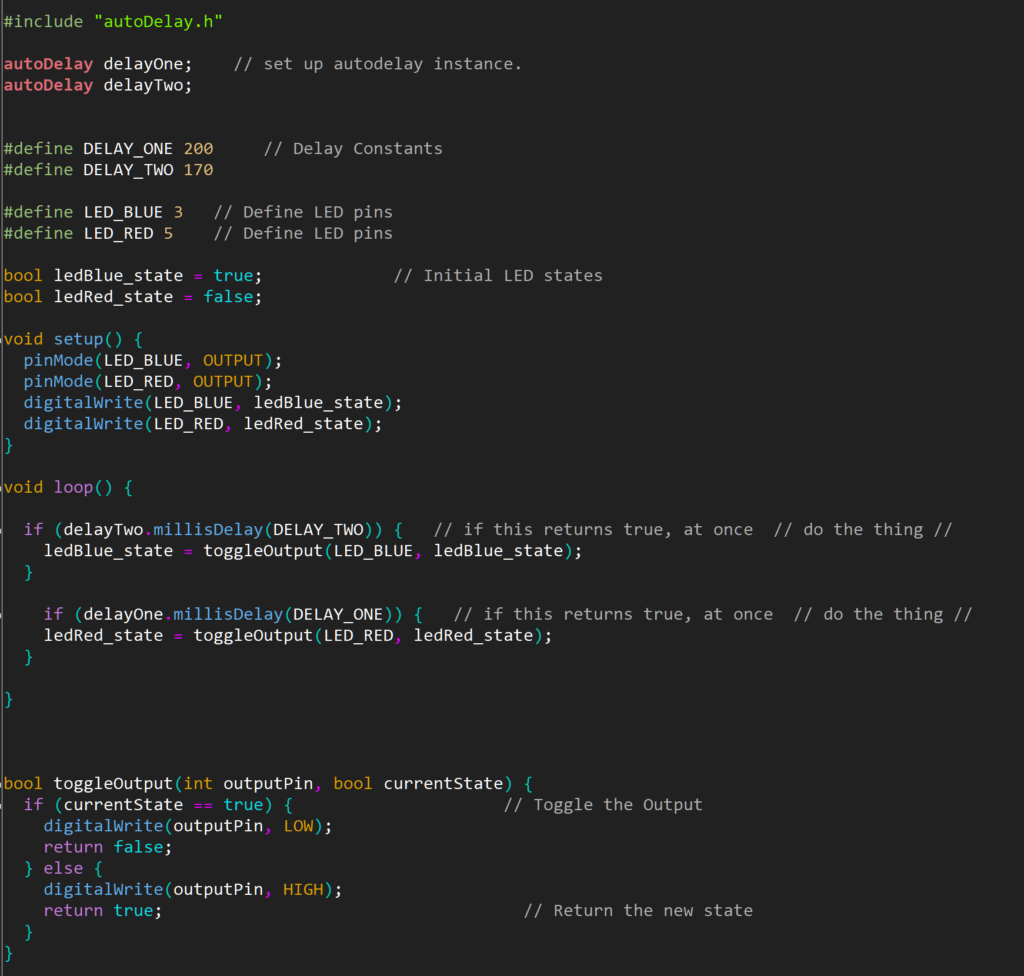
We can add as many autoDelay objects as we like, each one packages everything we need to handle one delayEvent. This way we can easily time many different events all independently.
Expanding Library Scope
So far, we have done all our delay timings in milliseconds. But what if we want to use microseconds, or seconds, or minutes? We could rewrite all our methods to handle each unit of time, do the calculations, change it to milliseconds, or microseconds. But it would be quicker to make a single global method, which does calculations in “units of time” only. Then we can write methods for each different unit of time that convert whatever value we pass it, into a suitable unit for the global method.
To do this, our globalDelay function will be passed 2 arguments. The currentTime, in whatever unit we are working in, and the delayTime in the same units. As during this method, the previousTime is updated from currentTime, it will also be in the same units.
This is our new globalDelay method:

By now we should know that any method we add to the .cpp file requires a prototype in the header file. As the globalDelay method is useless on its own, it should only ever be called by other methods within our library, we can place it under private: in the class body.
Our millisDelay method now just makes currentTime equal to millis(); then passes these values to our global method.

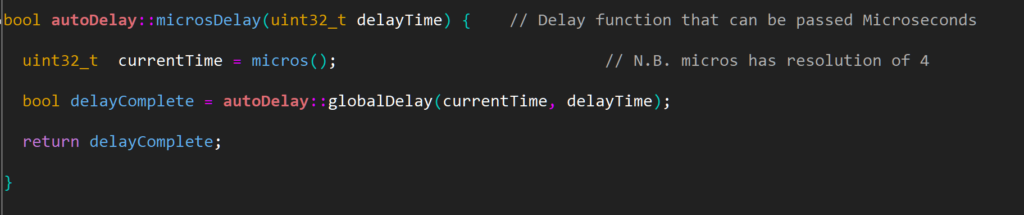
If we want to add a method that calculates delay times in microseconds, we can copy the millisDelay method above, but replace millis(); with micros();
To write a method for seconds or minuites, we just multiply the delayTime variable to make this equal to milliseconds, then do all the calcs in milliseconds.

Hopefully we should now be able to add the method for seconds without too much thought.
Modification for Finite Operation
This is something that I had implemented in my old ledObject library, but not in my delay library. As I am now merging the two I feel that it would be best to implement these functions in this library.
The brief is: To modify the function such that we can specify a number of times for an event to repeat before ending. It also requires some method of specifying an indefinite number of repeats within the same function.
To do this we will start thinking in terms of Object Orientated Programming again.
In OOP, we need to specify a function that is carried out every time through the main loop. Then we will use additional methods to “trigger” different behaviours from this method.
To differentiate this new method from the previous one I am going to call them delayEvents.
First we will add 2 new global public variables.
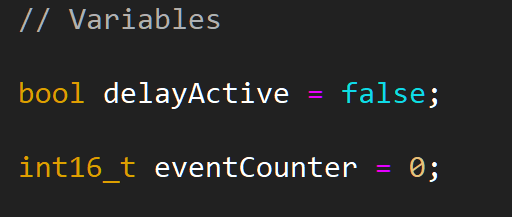
These will track whether the delayEvent should be active, and how many events are left to perform. eventCounter will be decremented every time a delayEvent happens, until it reaches zero, at which time delayActive will be made false and the delayEvents will stop.
As an easy way of specifying that the delayEvent should repeat indefinitely, we will make the decrement script work only on positive integers. If we pass a negative integer, the decrement script will not be carried out and the event will never reach zero.
This is our new delayEvent method.
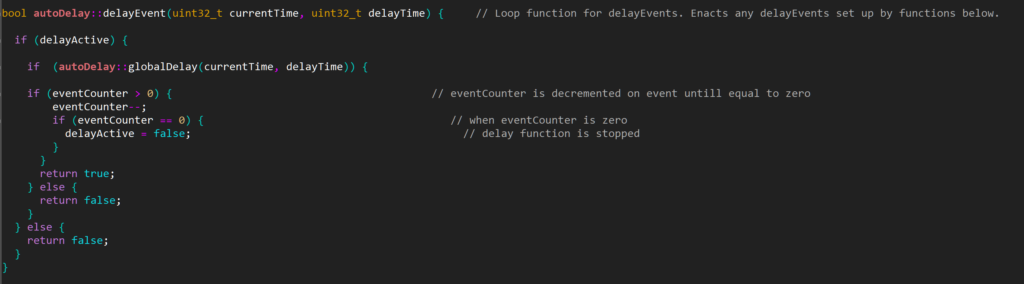
This method is useless on its own as it does not specify any specific units, so it must replace the call to globalDelay in our unit-of-time specific methods. We could just comment out the globalDelay line in each of these methods and change it to delayEvent, however I want to make sure this library remains totally backwards compatible with the previous version, which I already use in most of my sketches and many other libraries. Therefore I will just copy each of the unit-of-time specific methods, and add Event to their names. I can modify these methods and leave the original ones as they were.

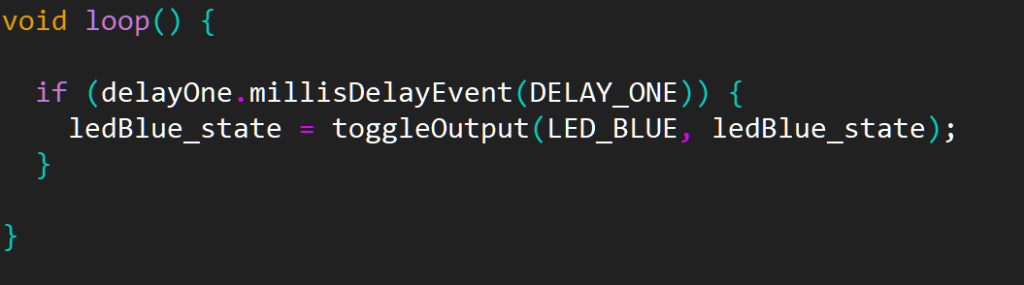
Our main loop could now look something like this.
If we compile and run this, nothing will happen. In order to trigger some behaviour, we need to write some control methods.
These will be functions we can call in response to some kind of input, let’s say a button press. For this example we can just put them in the setup() function to test them.

All our start function needs to do, is make delayActive true, and pass some number of repeats to eventCounter. In the prototype for this function, I specified repeats with a default value of -1, so it defaults to the infinitely repeating version.
While we are here, we could also cover many different eventualities. What about stopping the delay event?
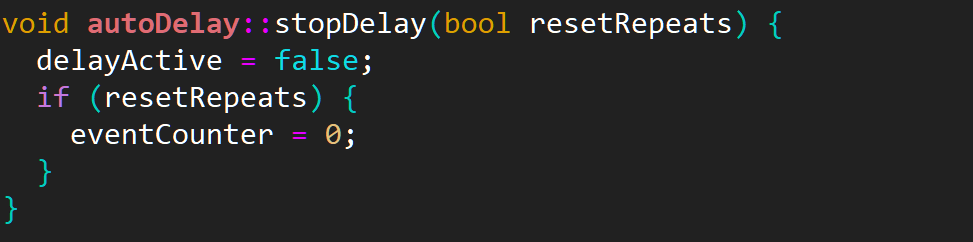
We can even include a way of specifying whether we should reset the eventCounter, or leave it at its current value, ready to restartDelay() if required. (Hint for a method that could be useful but I have not included in this lesson)
Or, we could even add additional events to our eventCounter variable while it is still executing the current delayEvents.
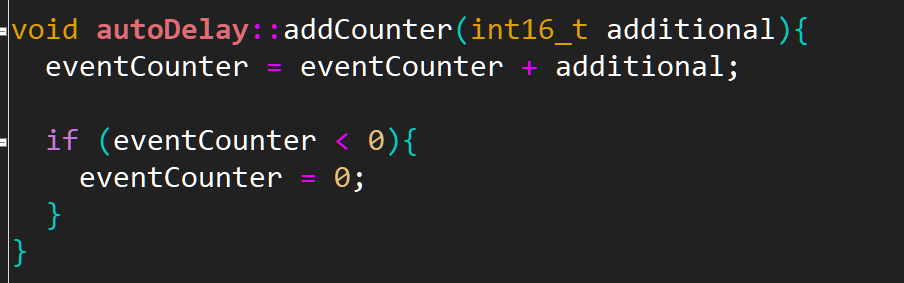
We have included an if statement in this method, to solve an edge case in which: we end up passing a negative integer which brings eventCounter into negative values, as this would trigger the infinite repeat behaviour. It is good practice to think about the implications of the code we are writing and try to engineer protection from edge cases & fix bugs before they impact our execution.
Any arguments passed to these methods have been assigned default values in the prototypes in the class body, so each of them can be called with or without passing the additional arguments. For example, addCounter() with no arguments adds 1 to the total number of delayEvents as a default behaviour.
Testing Our Library
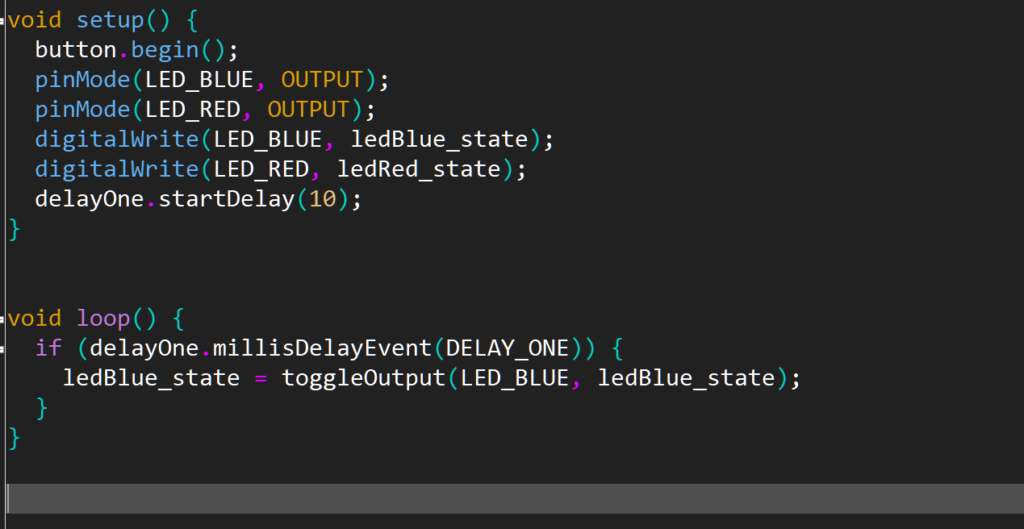
Now, to test the basic function of our control methods, I have added a call to startDelay in the setup(), and passed it 10 as an argument. I have changed DELAY_ONE time to 1000mS so it will be easier to count the LED flashes. When we load this program, the blue LED should flash 5 times. (10 toggles).
We have a success! We now have an all singing all dancing, Object Oriented library to handle every delay function we could ever need! I am not going to go through and test every function of it right now, but I will post a link to the Github repo containing the library when it is finished, and I would love to hear any feedback if someone finds any issue with it.
The only other thing I tested here was passing startDelay() “-1” as an argument and this does seem to produce the infinitely flashing behaviour we were expecting.
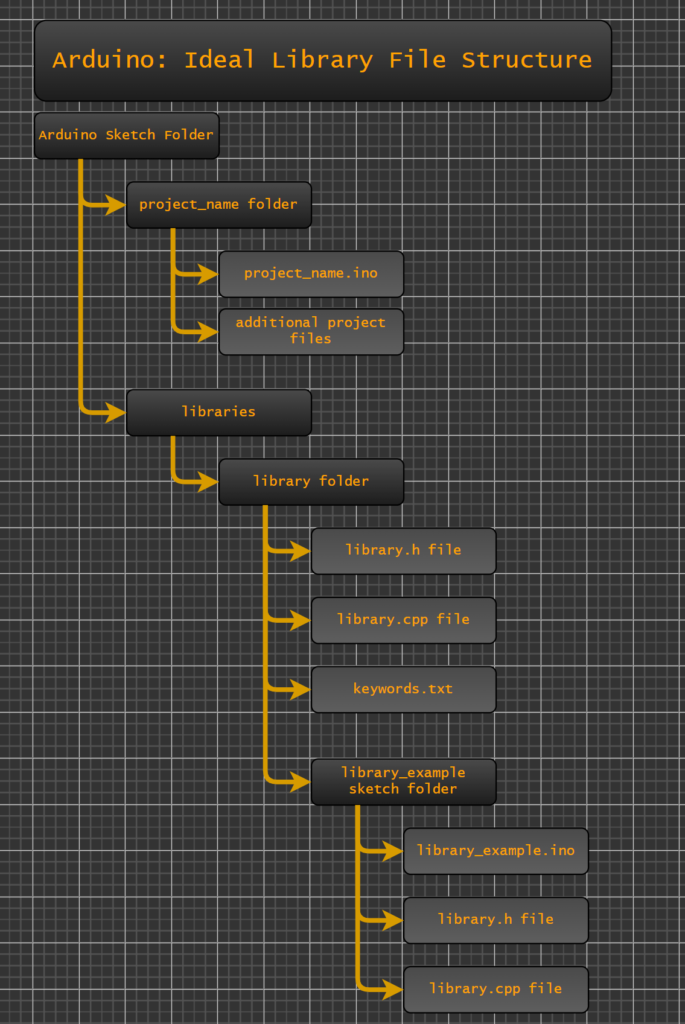
Installing Our Library
We are happy with our library. Time to put it into our libraries folder.
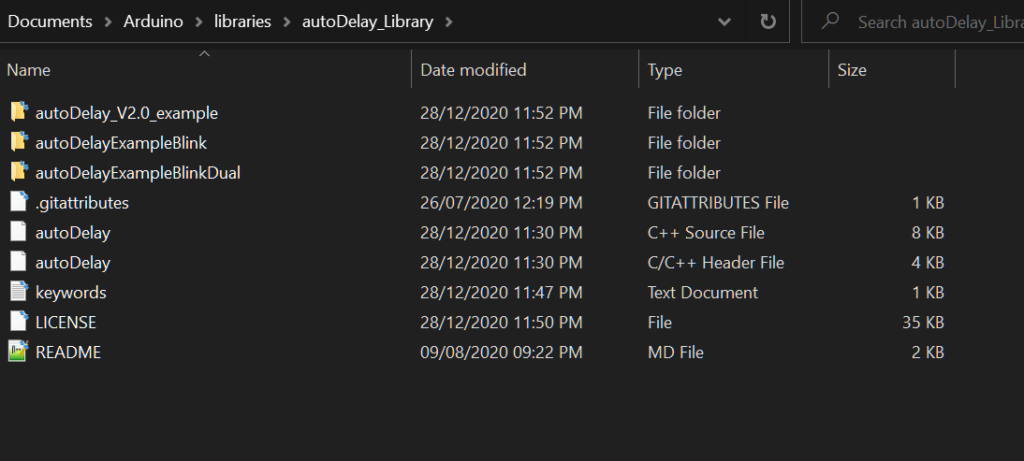
First we create a folder in the Arduino libraries folder called “autoDelay_Library”
Then we can copy and paste, or move our entire autoDelay_example sketch folder, into the autoDelay library folder.
Next we could move the .cpp and .h files from the examples folder, into the main library folder, however I prefer to copy and paste them, leaving a copy of each in the example sketch folder. This means when we open the example sketch in the Arduino IDE, we will also have the library files open if we need to look up function names or remind ourselves of how it works.
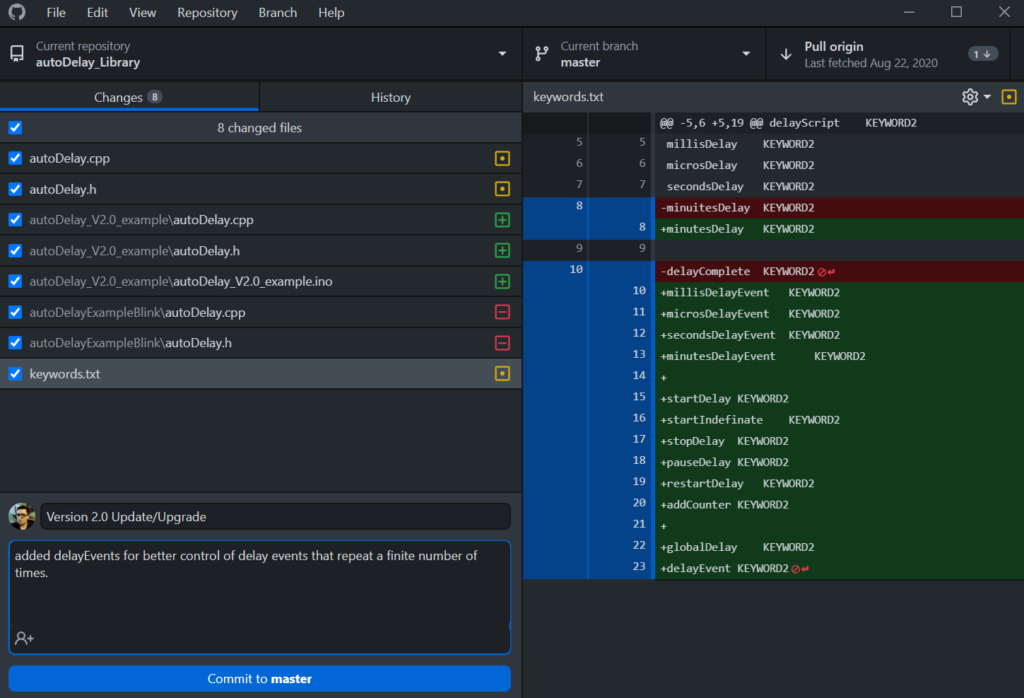
This is version 2.0 of this library for me, and I am maintaining this folder with GitHub, so I have some additional files and folders in there, but by now you should have a library folder with an example sketch folder, and the autoDelay.h and autoDelay.cpp files in the main library folder.
Now all we need to do is create a keywords.txt file. We can left-click and select new > text document. Save this as “keywords“.
The keywords file tells the Arduino IDE to highlight keywords in different colours.
The syntax is just:
keyword KEYWORD1
keyword KEYWORD2
The standard I use is KEYWORD1 for class names, and KEYWORD2 for public methods, important private methods, and important variables if desired. Have the header file open as you do this to reference the method names you have used.
Once we have saved the keywords file, I upload all my changes to github to ensure my work is backed up, and I can update my libraries at work and across other machines quickly and easily next time I am using them.
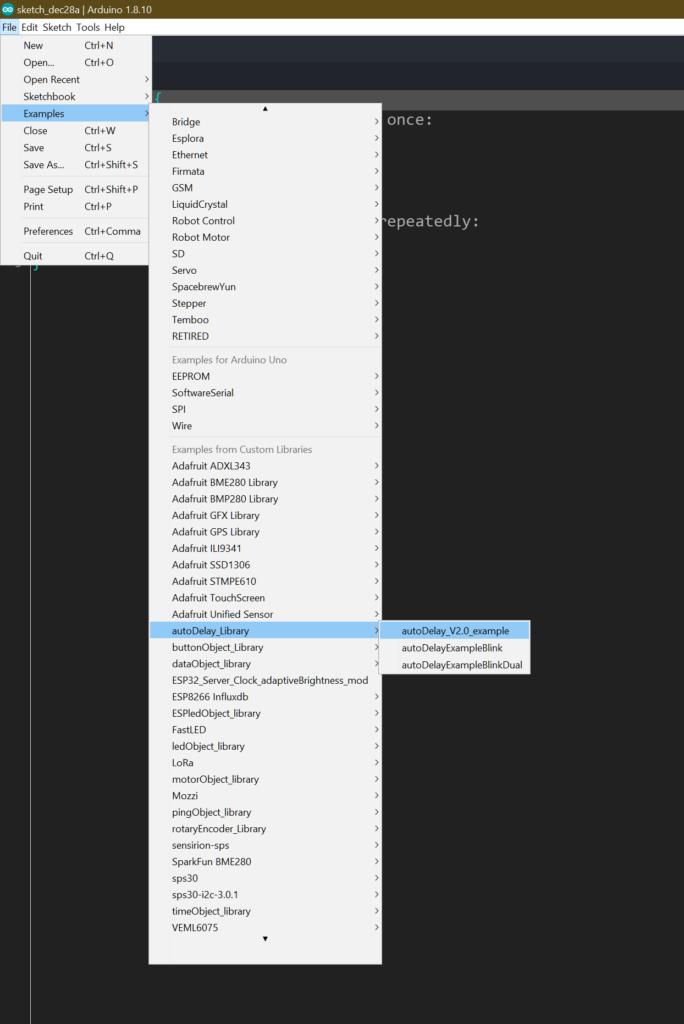
With out work backed up, now we can close then re-open the Arduino IDE, and our example sketch should be visible under; file > examples > autoDelay_library > autoDelay_example.
Conclusion
So now we have written two libraries, we have finished one and installed it into our libraries folder. Experiment with this library a bit, it should be able to do a huge amount of heavy lifting for timing various events.
You should now have all the tools necessary to start writing your own libraries. Start small, write solutions for LEDs, single buttons, basic building blocks that you can use and reuse again and again, as we have seen we can quickly turn a simple idea, like turning an LED on and off into a complex series of behaviours.
For beginners, this is as far as I would recommend going until you have put these ideas into practice a few times, however, in the next lesson we will cover a method for including one library inside another. This could be used to build more complex behaviours, for writing higher level code, or to wrap somebody else’s library inside your own. For example: In order to complete the Rocket Countdown Clock, I wrote a library to turn a time passed as a series of integers into a 7 segment display. To do this I relied on including the FastLed library inside of my own.
I really hope you found this useful. Good luck writing some of your own libraries.
Here is the link to the finished autoDelay library on GitHub, however you should be able to complete your own with the information here.
Previous Tutorial:
Next Tutorial:
Lesson Eight: Coming Soon