Writing_your_own_Functions(){
usingFunctions();
}
One of the major problems people newer to the Arduino development environment have, is splitting their code into digestible and easy to read chunks. This gets in the way of their own understanding, makes it exceptionally difficult to fault-find and near impossible for others to pull apart their code to find the errors.
Breaking things down into specific functions will help you understand what each line of code is doing, why it is where it is, and it will help you modify it to use it in the way you want to use it. and it will help others who are reading your code understand the intent behind it, and where errors may be being made.
You can even boost your ability to quickly write good code just by taking useful functions, directly out of the Arduino IDE examples, wrapping them in your own function and using it in your own code.
Even if you don’t understand exactly how that bit of code is doing what it does, as long as you understand the inputs and outputs of that function, you will find it easy to use and modify, and debug that function to use in your own programs.
What holds people back? Generally they just have not yet learned how to specify and call their own functions! The Arduino IDE examples are very bad at explaining this, but it is not a difficult thing to do at all, so we will start here. First a bit of light theory (it won’t be too bad I promise)
What is a Function?
A function is an individually packaged section of code that does a specific thing. There are many we commonly use, already specified in the libraries automatically included by the Arduino IDE, every time we compile our code. You will have almost certainly already used some common functions like:

So in each of these calls to a function, we have the function name, brackets, and some value passed to the brackets. These are called arguments, and they can be variables, constants, even calls to other functions, or they can be left blank, depending on how the function was specified.
Some of these functions, like digitalWrite(), or delay(), interact with hardware or perform some task, and may or may not also return a variable we can use.
Other functions, like analogRead(), return a variable as an output. In the case of analogRead(), this is a 10 bit integer from 0 to 1024. The returned value depends on how the function is written, we will cover this later in greater detail when we write our own functions.
In order to use this kind of function, we need a variable to “save” the return variable. This is as easy as setting some variable as equal to the function.

Or we can use the return from this function directly as an argument to another function.

This line will first; sample the analog voltage on analogPin, then pass the result directly to the delay() function, which will interrupt our program for 0 to 1024 milliseconds depending on the sampled value.
There are also two other functions that we will already be familiar with, we will cover quicky.

Both setup() and loop() are functions called during compile time by the Arduino IDE, however these ones do not contain any visible code until we add something to them. It doesn’t matter too much, I just wanted to make sure we understood that these are also just functions.
Now we understand what functions are, we can start writing our own.
Writing Our Own Functions: Method & Code Examples
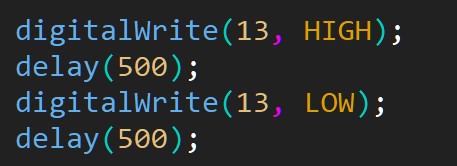
Take a simple code which might go inside void loop(). Here we are blinking an LED on and off once a second.

If we wish to package up a few lines of code to do a specific task, in this case flashing an LED, declare a new function outside of any other functions by declaring a variable type, and giving our function a new unique name.

Here we have declared a new function blink_led, and we have given it a void type as it does not return any data, it does the thing, blinking the LED, then exits.
Once this is done, it is easy to use this bit of code in our void setup(), void loop(), or any other functions we have written.
To use this function, we can just call it like this:

Simple Right?
But this function is very basic. It does one thing and one thing only. What if we want to make it more generic so we can use it for different things in different places?
As with some of the built in functions we looked at, we can declare variables within the brackets of a function as Arguments.
In the example below we will declare the variable delayTime as an int. This variable is overwritten every time the function is called.


Now when we call this function, we need to pass it an int as an argument, otherwise delayTime has no value. *note 1

We can also pass more than one argument into each function & we can specify a default value, so if we do not pass any values as arguments, the function will still work with the defaults provided.
This time I want to make a function that controls the time HIGH and the time LOW independently. I am also going to pass the pin of the LED as a variable, so we can use this function to control different output pins.

To use this function, we can call it inside other functions by passing it three arguments. These could be ints, we type directly into the call to the function;

or we could past the function arguments that are variables modified elsewhere,

or we could pass the outputs of other functions, as arguments input to this function.

In the example above we have passed as an argument;
– A variable to select the current led. This could be a variable that is iterated over elsewhere to control a series of LEDs on different pins.
– A function, analogRead() which returns an int value measured on an analog input pin.
– An algorithm which adds 50 to the value returned from the analogread function.
With just one function written, we are now able to easily code some fairly complex behaviour for one or a series of LEDs.
What happens now if we do not pass this function any arguments?

Well, we have already passed it values for this situation, it will use the defaults we specified when we specified the function. ledPin = 13, timeHigh = 1000, and timeLow = 500. This call to a function with no arguments is now valid.
Returning Variables from a Function
So far, we have dealt with specifying functions that do not return a variable using the void type, but what if we do wish to return a variable from a function?
In this case we declare the function with a non-void type, this could be an int, a long, a bool, or many other variable types.
Consider this function, which we could use to return, in milliseconds, a time value passed as an argument to the function in minutes:

// minutes x 60 = seconds. seconds x 1000 = milliseconds
N.B: If we declare a function as any non-void variable, and we do not include the return variable; line, the program could fail when we try to compile it.
When we call this function, as noted above for the analogRead() function, we need to pass the output from the function into a variable to save it, or as an argument to another function:


Both of these snippets will delay the program for the number of milliseconds calculated from the 5 minutes we passed to our function as an argument.
It doesn’t matter which way we implement this, both are perfectly valid implementations.
Summary
I hope you find this information useful. Try and apply it to some of your own code.
Remember, Functions are best when they are:
– Concise
The shorter and more concise they are the easier they will be to follow and reuse in other places.
– Specific
Try and make each function responsible for a single “thing”, So if you have a function to flash an LED, keep this separate from reading a sensor.
– Generic
Try and think of ways that functions you write could be used in other places, could you make any hard coded variables into an argument which is passed each time?
– Fast
A function should aim to be run a quickly as possible. This means avoiding things like delay() which hang the processor inside a function. We have used delay() here for simplicity, however it is best to avoid using it altogether. A good alternative to delay(); will be examined in lesson 2.
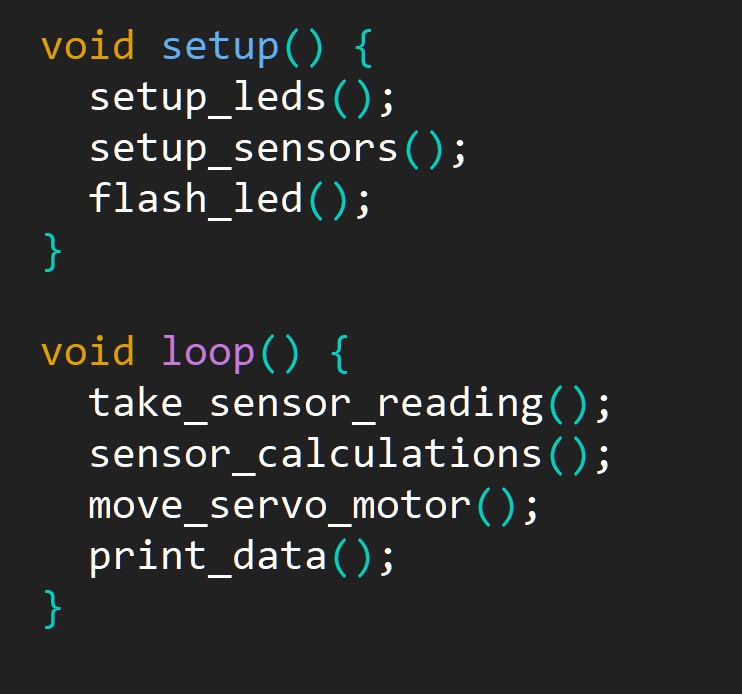
The eventual aim of writing functions should be a void setup() and void loop(), which read like a set of instructions outlining what your code is doing.

Now, by reading our setup and loop, we know exactly WHAT the code is doing, and if we want to know HOW our code does it, we can read each function to see how each specific function is performing its task.
Once a function is written and you are happy with its performance, it’s now a snippet of code which you can recycle and reuse, and you don’t need to worry about how it functions, you can just concentrate on what it does, and how you can use this to produce the behaviour you want from your program.
Notes:
*note 1: Likely error message for missing arguments to a function with specified arguments with no default values:


Thank you for explaining this. My last programming experience was with C in the early 90’s and I remember defining and declaring functions at the start of the program. The Arduino code seems a bit more haphazard, with functions popping up in the Loop section. Sometimes, for me, that way of coding is hard to follow. I appreciate you efforts in clarifying this.